
In my teens I used to be a (penniless) tape freak. For years I had to make do with first a portable stereo radio cassette (later extended with two car speakers in DIY cabinets), and then a music centre. On my 18th I graduated to a TEAC V-455X, a deck these days termed 'BPC'. (And yes, it was!)
A bit later, not that penniless anymore, it was a Nakamichi CR-2E. All these years I spent recording and rerecording and rererecording my LPs. Whenever I got a new deck all, had to be redone. Whenever I got a new turntable, all had to be redone.
This ended with the arrival of CD. I found taping CDs not very satisfactory (it felt wrong), and the LPs just sounded much better directly from the turntable (a Michell GyroDec at that time) than from the Nak. The CR-2E fell idle. I purchased a DAT, but it wasn't much fun either. I sold it not too many years after for peanuts.
Nevertheless, I kept the Nakamichi, if not in the main system, then at least in the secondary system. Not that I used it, but I kept it pristine. Until in 2010 or so it developed dead cam motor disease. It was a boat anchor, until in 2014 I went for it and repaired it, cam motor revision and all. Even though I had an excellent guide in Henk Schenk's Nak repair site, fixing it was not exactly my idea of a good time. I slipped it back in the rack, and forgot about it.
FF to 2017. I don't quite remember why, it certainly was most irrational, but having found a lively subculture of tapeheads keeping their decks themselves in working order, and restoring fine examples for others, I suddenly purchased a revised Nak Cassette Deck 1 from a reputable source in the Netherlands. I always wanted to have a three-head Nak, and that was it. I thought.
Wanting to maintain the CD1 myself I started reading up, as well as stocking up on useful things like spare motors and alignment tapes. I also found myself browsing websites, looking at used classic decks, particularly TEACs. Just looking, mind, marvelling at those brilliant but ancient machines and at the fact that they were still around... I remembered I used to dream of the likes of the C-3RX, V-1RX, V-900X etc.
One day brought an ad for a good-looking but cheap A-550RX. Not quite top of the range in 1979, but it shared at least some of its design language with the mighty C-series. The seller ensured it was fine, except that the belt, being 'too tight', 'occasionally slowed down the motor a bit'. I am a hoarder and I hate this. I had just spent several months eliminating unused stuff from my audio harem. I would be nuts adding another big and useless lump to it, right now that I was finally getting back some space in the music room. But the TEAC looked so nice ...
50 Euros. Home-delivered. All 10kg of it. Pretty: yes. Working: no. Of course not. What was I thinking?
Fast Forward and Rewind did a bit, but with pitiful torque. Play was a joke, the takeup reel going clockwise.
But I was prepared. The 550's service manual is not available at www.hifiengine.com. That is bad, but after looking much at other TEACs it appeared that the A-500 and A-510 had a lot in common with the 550. And the 510's service manual was available for download here. Further investigation found someone with a similar case of undesired reversal, suggesting that the main belt might be threaded wrong. Peeking into the top of the transport showed that, indeed, the belt was running over the wrong side of the reel idler. Armed thus I was sure I could, with a lot of effort, find a better fitting belt than the one present. (Oh, Marrs has the reputation to be an excellent source for original belts, but factoring in shipment cost and taxes, a single rubber band would cost me a multiple of what I paid for the deck, all while not even knowing if the heads and electronics were still functional!) But I was lucky, and found a place with a limited offer of belt kits, which happened to include the 550. 15 Euro. The work could start in earnest.
In order to replace the belt the transport has to be removed. This takes quite a few screws, some of them in unexpected places and requiring long tools.


Then came the first hurdle. According to the A-500/510 service manual the transport should just lift out after removing the screws and connectors, and pushing it back. Not so here. Whatever I did, it always seemed to snag on some fragile looking bit somewhere. I then looked closer at the available pictures of all these decks, and it appeared that the 550's power supply board simply was a larger than that of the other decks. Loosening the PSU board and the small board with fuses enabled me to take out the mechanism ... but only just so.


Then you have to unhook the eject spring (don't damage it), bend open a few wire retainer clips and move all wires aside. This allows to remove four screws from the transport's back plate and remove it, freeing the flywheel. To remove the flywheel I would expect one to have to remove first a washer from the capstan, but this ring was missing in my deck (probably lost by the previous owner when 'fixing' it).


Once the flywheel is gone you have access to the transport's innards. At the bottom of the picture below you see the belt I removed. It looked like something taken from a Caterpillar, totally unsuited to the task, and to boot, roughly trimmed to width by hand. Small wonder the transport didn't work at all.

You also see in the picture above that white idler wheel. The main drive belt has to go around the flywheel, while running beneath the idler. The previous owner had the belt running on top of the idler, obviously reversing its direction.
I cleaned the flywheel with IPA, put a few drops of Mobil One 0-W-40 synthetic motor oil in the capstan bearing (from both sides, each time tilting the transport a bit, letting the oil creep in), and on the capstan itself, and added fresh grease to the flywheel's trust bearing on the transport back plate.
Then it was time to put the flywheel back in place, taking care not to damage the capstan, all while threading the drive belt and the tension belt properly. As I do not have three hands and elven fingers I taped the drive belt backwards over the flywheel, together with a hook made from steel cable. This allowed me to put the tension belt in place first, pulling the drive belt around the motor pulley later, once the flywheel was in place.


Then it was time for reassembly, doing the previous steps in reverse order. Just by plugging in the power and control connectors, leaving the two signal connectors free, it is possible to test the transport outside of the deck. A strange sight ...

After putting the power supply back in place testing could begin. And all was well. Or so it seemed. FF and REW worked, and were even remarkably smooth and, erm, buttery. Play worked too. Really. I was rather pleased with myself here. But upon hitting STOP the tape stopped, yes, but the pinch roller did not fully disengage, trapping the cassette inside. Luckily the tape well cover had been removed at the start of this job, so I could bring down the roller with a screwdriver. What was wrong???
I looked around, read a lot, and could not come to a firm conclusion. The roller is operated by two solenoids. One solenoid takes care of moving the head bridge, while also bringing up the roller for 90% of its travel. A second solenoid implements the PAUSE function, and performs the final 10% of travel. It was this last part that failed consistently to let go, and no idea why .. There was only one way forward: to take the mechanism apart once more.
With the back plate removed I could work the linkage between solenoid and roller by hand (this is safe to do, as some experience and friendly technicians on www.tapeheads.net attested), and by pushing away the linkage I could work the solenoid plunger itself. Both seemed fine, but I cleaned and then greased the linkage anyway. A bit depressed I started playing with that plunger and lo, I did seem to feel a little bit of motion resistance there. Just a tiny bit, almost as if imagined. With nothing to lose (remember that at this stage I did not even know the deck would ever play any good at all), I cleaned and then applied a drop of oil to the plunger and spread it around. All resistance vanished at once, and after reassembly the transport worked ... perfectly.

Now before you try the same: the same techs mentioned above state that one should never oil a solenoid plunger. Oil has no business inside a solenoid, and oil can clog the tiny air canals that are required for proper operation. Taking the solenoid apart and cleaning it is the right course of action. (This said, after one year this transport was still working beautifully.)
Having come this far the mechanism was functional again, and I could start working on the electronics and the alignment. After a while, however, rewinding got tired, then winding, and eventually both functions stopped working. Play was still fine.
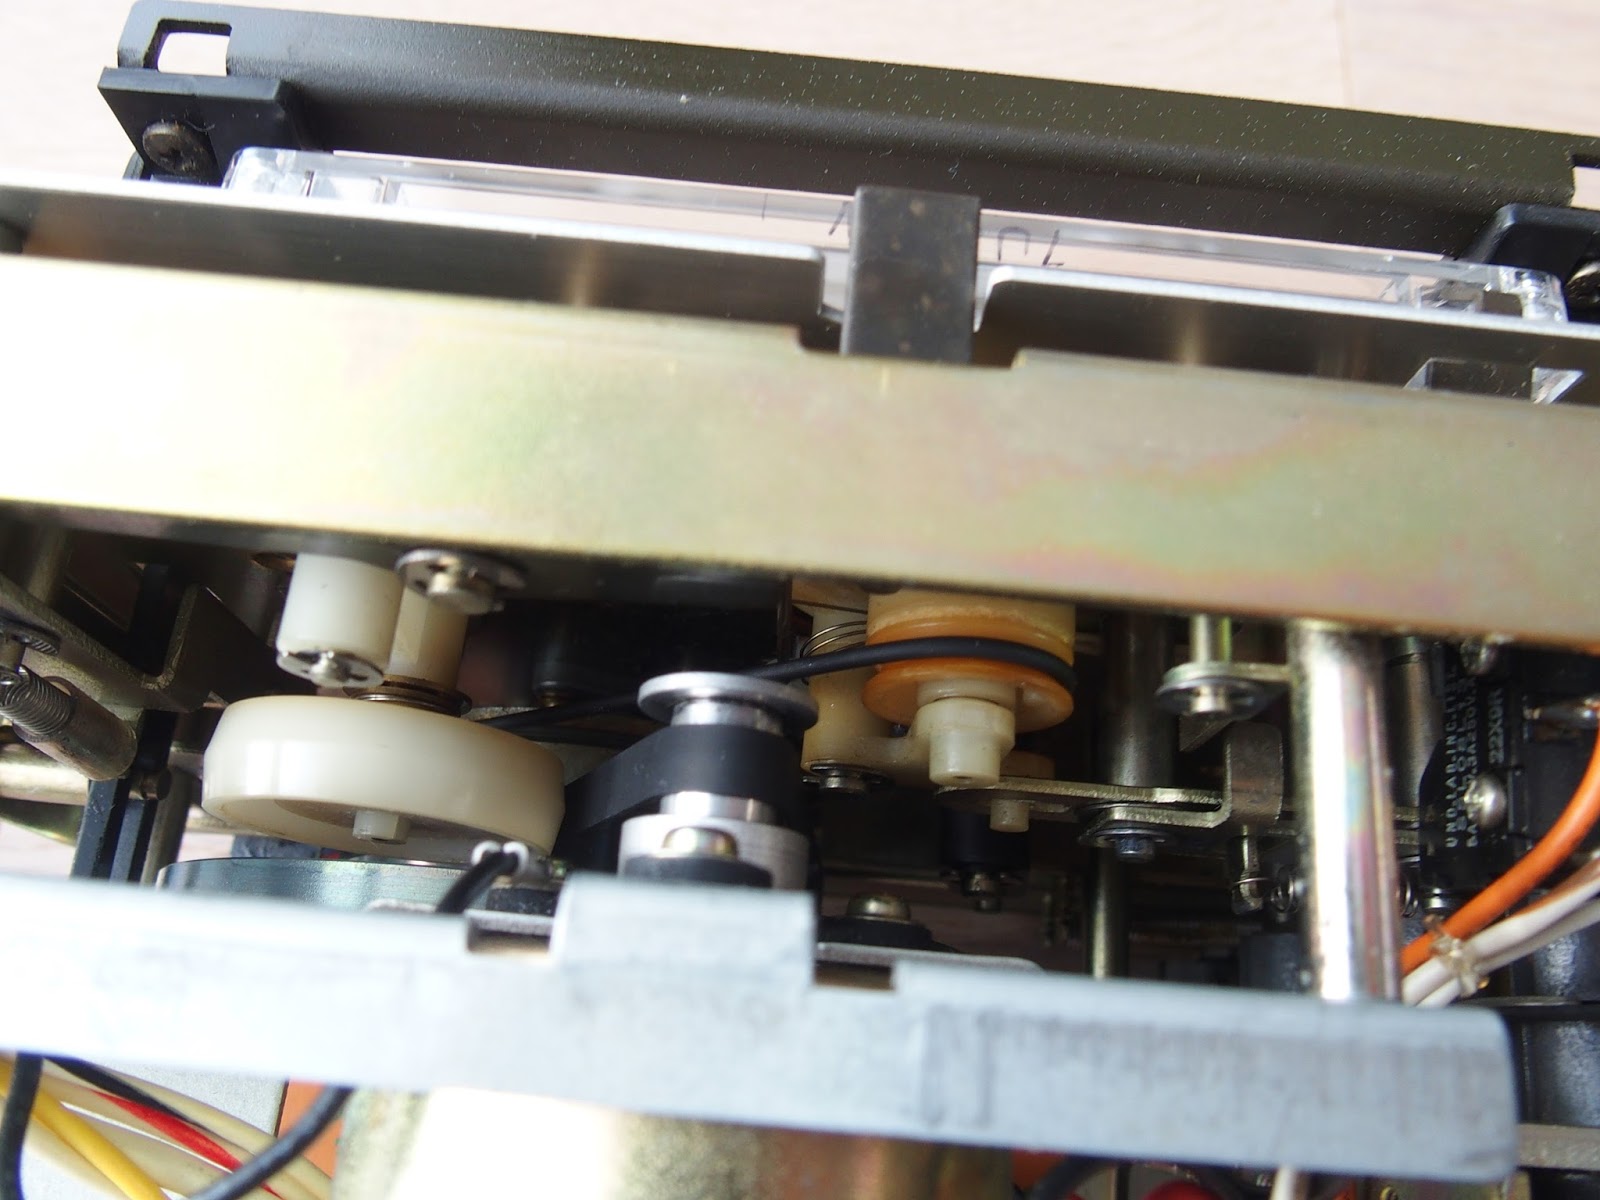
Opening up the transport again I found that each mode has its own drive method.

The large white wheel left of centre in the image above is driven via a secondary belt from the flywheel, through a clutch. During REW it directly contacts the rubber rim of the supply reel. During FF it drives the rubber rim of the takeup reel via the rubber-rimmed idler wheel right of center. And during play the takeup reel is driven by the tiny white axle seen at the right in the picture. This axle sits on a larger wheel (hidden) which is driven by the capstan belt.
The two white weels were cleaned with alcohol, and the rubber surfaces of the reels and the idler were first lightly sanded, and then treated with Platenclene. This restored functionality.
In the next instalment we'll look at first trials, an attempt at aligning the A-550RX to modern tapes, power supply recapping, and some maintenance and modifications to the audio electronics.


Part 1: http://audiochrome.blogspot.be/2017/12/restoring-teac-550rx-cassette-tape-deck.html
Part 2: http://audiochrome.blogspot.be/2017/12/restoring-teac-550rx-cassette-tape-deck_30.html
Part 3: http://audiochrome.blogspot.be/2018/01/restoring-teac-550rx-cassette-tape-deck.html